Hair knowledge
Step-by-Step Boho Braids: Video and Pictorial Guides
Boho braids have an irresistible charm that brings a free-spirited and elegant vibe to any look. Whether you’re heading out for a casual day or preparing for a more formal event, you’ll always look perfectly in place. The versatility and effortless appeal of Bohemian Braids make them a favorite among those seeking a stylish yet manageable hairstyle.
If you’re looking to try this beautiful style, our comprehensive guide will walk you through two installation methods: traditional and knotless. These step-by-step tutorials, complete with video and pictorial guides, will make it easy to achieve perfect boho braids from the comfort of your own home.
We’ll also provide helpful tips and techniques to ensure your boho braids always look their best. Whether you’re a beginner looking to learn the basics or an experienced braider seeking to refine your technique, you’ll find valuable insights and tricks to master the art of boho braids. From prepping your hair to maintaining the style, we’ve got you covered every step of the way.
Ready to learn from the pros at HazuHair and create stunning styles that turn heads? Let’s get started with our detailed guides and transform your hair into a work of art with beautiful boho braids.
Preparing Your Hair and Supplies
Before you start with either installation method, it’s important to prepare your hair and gather all the necessary supplies. This will ensure a smooth and successful braiding process.
Here’s what you’ll need:
- Freshly Washed and Stretched Hair: It’s crucial to start with clean, detangled hair. Use a gentle shampoo and conditioner to wash your hair thoroughly. Afterward, use a hair dryer and a rat tail comb to stretch and detangle your hair. This step helps to create a smooth base for braiding, making the process much easier and ensuring a neat final look.
- Hair Dryer and Rat Tail Comb: These tools are essential for stretching and detangling your hair, allowing you to work through any knots or tangles efficiently.
- Three-Way Mirror: A three-way mirror can help you see the back of your head and the sides, making it easier to braid evenly and check for any missed sections.
- Two Packs of Deep Wave Boho Braids: These extensions are ideal for achieving the boho braid look, providing volume, texture, and that beautiful wavy effect.
- Three to Four Bundles of Water-Wave Human Hair: Adding these bundles will enhance the natural texture and appearance of your braids, giving them a fuller, more bohemian style.
- Conditioning Gel: This will help to smooth and define your hair, especially along the edges and baby hairs, making it easier to braid and preventing flyaways.
- Edge Brush: An edge brush is perfect for smoothing down baby hairs and ensuring a polished finish around the hairline.
- Hair Clips or Pins: Use these to section off your hair while you work, keeping the rest of your hair out of the way and organized.
- Hair Mousse: Apply mousse to your braids after styling to help set them and add extra hold without making your hair feel stiff or weighed down.
- Hair Oil: A few drops of hair oil will keep your braids looking shiny and healthy, preventing dryness and frizz.

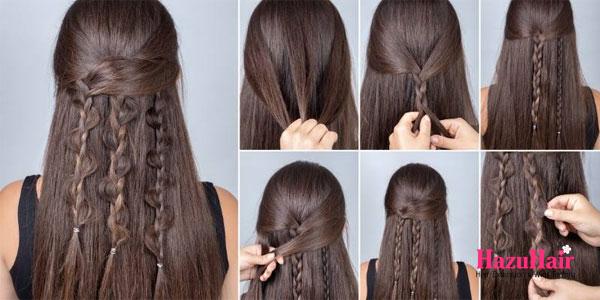
Method #1: Traditional Goddess Boho Braids
This method typically takes around 8-12 hours to complete if you’re doing it yourself. It requires patience and precision but results in beautiful, intricate braids.
Step-by-Step Guide:
- Divide Your Hair: Start by dividing your hair into three equal parts two sections in the front and one in the back. Ensure the parts are neatly separated with a straight line down the middle to create a professional look.
- Start Braiding from the Back: Begin braiding from the back, working your way up. Take a section of hair from the back parting and divide it into smaller parts for individual braids. This will help maintain clean, straight lines throughout the braiding process.
- Apply Conditioning Gel: Use conditioning gel on each section before you begin braiding. This will help the braiding hair adhere better and make the process smoother.
- Plait the Braiding Hair: Start by incorporating the braiding hair into your natural hair. The unique feature of boho braids is the inclusion of deep wave human hair.
- Process:
- Plait a piece of braiding hair into your natural hair.
- Add a strand of wavy human hair behind the braid match the shorter end with the middle section and the longer end with the right section.
- Continue braiding as usual and then pull out the long, curly hair before continuing the braid.
- Repeat this process, adding 4-5 pieces of Kinky Curly Human Hair to each braid.
- Process:
- Secure the Braid: When you reach the end of the braid, secure it by knotting a bit of human hair around it three times. This creates a neat, clean finish.
- Maintain Clean Lines: As you braid, ensure you’re creating equal sections and straight lines. Aim for about nine rows of braids three rows behind each ear and six rows above the ears.
- Oil Your Scalp: Once all braids are complete, apply a light oil to your scalp to keep it moisturized and healthy.
- Apply Mousse and Steam: Work mousse throughout your braids and curls to set the style and add extra hold without weighing down your hair. For a softer, more natural look, use a steamer to gently loosen the braids, enhancing the boho texture and making the curls more defined.

Method #2: Knotless Boho Braids
Knotless Boho Braids provide a more natural, less painful alternative to traditional braids, reducing tension on the scalp while still delivering a stunning, bohemian look.
Steps to Achieve Knotless Boho Braids:
- Part Your Hair: Start by using a rat tail comb to divide your hair into four main sections. This will help you manage the braiding process more easily.
- Create the First Row: Begin at the nape of the neck. Split this section into three smaller parts these will form your first row of braids.
- Build the Second Row: Use the center braid from the first row as a guide to split it in half, creating four sections. This “brick lay” technique involves offsetting the parts in each row to make the braids appear more natural and prevent gaps.
- Continue the Pattern: Continue this pattern as you move through the back section of your hair, creating five rows total. As you work your way up, use your temple as a reference point to guide the placement of the first row on the sides.
- Start Braiding: With your sections ready, start braiding using the knotless technique:
- Take a section of hair in your right hand (the furthest left piece).
- Using your left hand, go underneath and grab the piece furthest to the right.
- Take a piece of braiding hair and wrap half of it around your pinkie. Place this on top of the braid under your pointer finger and thumb.
- Perform a braiding movement, then place the piece between your pointer finger and thumb.
- Gradually feed in more braiding hair as you go along.
- Add curly or wavy human hair pieces just as you would add braiding hair. However, instead of braiding them in completely, leave the curly pieces out of the braid and allow them to hang freely for a more bohemian effect.
- Secure each piece of human hair with a few braiding movements before adding the next one.
- Finish the Braid: Once you’ve completed the braids, apply a generous amount of hair mousse throughout to give your braids a polished, sleek finish.

Tips and Techniques for Perfect Boho Braids
To achieve the beautiful, effortlessly chic boho look and maintain your braids effectively, here are some essential tips and techniques:
Preparation and Tools:
- Prepping Your Hair: Before you start braiding, make sure to apply a generous amount of hair gel or leave-in conditioner to your hair pieces. This helps to prevent tangling and makes the braiding process smoother. It also ensures that the hair pieces glide easily through your fingers, reducing friction and breakage.
- Utilize the Three-Way Mirror: Always use a large, three-way mirror that provides a full view of all sides of your head, including the back. This will help you maintain symmetry and evenly distribute the braids throughout your hair. It’s crucial for achieving a professional-looking finish, especially when you are doing your own braids.
Braiding Techniques:
- Soft and Natural Fall: To achieve that soft, natural look with your boho braids, use a slippery hair product like gel or a styling cream as you braid. This technique works particularly well for jumbo braids, helping the hair to move naturally rather than bunch up uncomfortably. It also adds a sleek finish to the braids.
- Brick-Laying Technique: Use the brick-laying technique by offsetting each row of braids. This approach creates a more natural and fuller look by reducing gaps between braids and preventing the hairstyle from appearing too uniform. It’s essential for giving your braids a more realistic, lived-in appearance.
- Avoid Tight Braids: Be cautious not to braid too tightly, especially around the edges where hair is more delicate. Tight braiding can cause breakage and discomfort. Opt for a looser, more relaxed braid style to minimize stress on your scalp and maintain the health of your natural hair.
Self-Care and Maintenance:
- Take Breaks: Installing boho braids can be time-consuming, especially if you’re doing it yourself. Remember to take plenty of breaks as you braid to avoid fatigue and ensure your comfort. It’s better to work in sections and pace yourself to prevent any strain on your hands or scalp.
- Nighttime Care: After completing your braids, protect them at night by wrapping your hair in a soft, satin scarf or a silk bonnet. This will help to prevent frizz and maintain the neatness of your braids. Satin and silk materials are gentle on the hair, reducing friction and breakage while keeping your style intact.
- Regular Maintenance: To keep your boho braids looking fresh, regularly apply a light oil to your scalp and a leave-in conditioner spray to refresh the curls. This will help maintain moisture and keep the hair soft and manageable between washes. It’s also useful for taming any flyaways and keeping your style polished.

Mastering boho braids
Mastering boho braids can be both challenging and time-consuming, but it’s well worth the effort for the stunning, versatile look they create. These braids offer a free-spirited, effortless charm that can transform any hairstyle into a work of art.
Whether you opt for the traditional or knotless technique, patience is crucial. It’s important to take your time to ensure each braid is neat, well-formed, and evenly spaced. The key to achieving a flawless look lies in careful preparation and precision prepping your hair, using the right products, and applying consistent techniques.
Remember, the journey is just as important as the end result, so don’t rush through the process. Embrace the experience and enjoy the process of crafting your boho braids. With practice, you’ll be able to create a look that lasts for weeks, allowing you to effortlessly maintain your beautiful, bohemian style.
and…
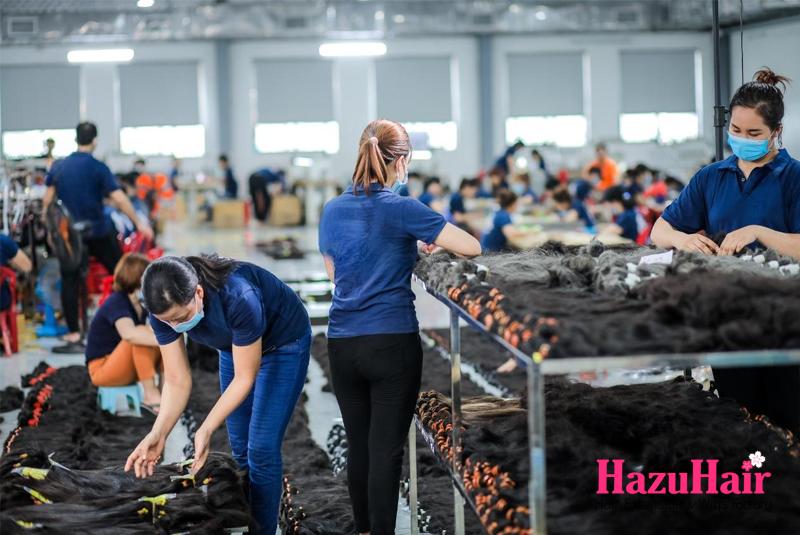
If you’re looking to buy high-quality wigs or hair extensions, look no further than HazuHair.
We are a trusted Vietnamese hair factory with over 100 skilled workers, offering a wide range of hair styles including wavy, curly, straight, kinky, and more.
Our products come in various colors such as natural black, ombre, blonde, red, pink, and many others.
Reach out to us today!
- Hair Factory: Tan Son 2 Village, Tan Dinh, Lang Giang, Bac Giang Province, Vietnam
- Hotline: +849 4949 3883
- Whatsapp Mrs ThanhLam: https://wa.me/84949493883
- Website: https://hazuhair.com