Hair knowledge
How to Disguise Your Hairline with Straight Closures
Ever wondered how models always seem to have flawless, picture-perfect hairlines? Is it all natural, or are there secrets behind their impeccable looks?
Many models do have great hair, but the magic often comes from expert styling techniques and you can achieve those same results with the right tools. Hair extensions and closures are key to unlocking a stunning, natural look.
Among the wide range of hair extensions, closures stand out as the ultimate solution for a seamless, protective style. Unlike traditional weaves that leave some of your natural hair out to blend with the extensions, closures completely cover your scalp, offering full protection while still giving the illusion that the hair is growing directly from your head.
If you’re looking for the most natural finish, straight closures are your best friend. At HazuHair, we offer premium straight closures designed to create the perfect blend of style and realism. However, even the highest-quality closure needs proper installation to achieve that flawless, natural hairline you desire.
So, let’s dive into how you can transform your look and get a realistic, smooth hairline with HazuHair’s straight closures!
>>>Why Every Woman Needs a Bob Wig in Her Wardrobe!
The Complete Guide to Straight Closures: Styles, Sizes, and Options
Straight closures are the unsung heroes of protective styling, offering full-coverage solutions that blend seamlessly with your natural hair or wig for a flawless, scalp-like appearance. Unlike traditional weaves or tracks, closures are attached to a lace base, meticulously crafted to mimic a natural scalp with individual hair strands knotted into the lace fabric. This ingenious design provides a realistic finish while safeguarding your natural hair from heat damage and over-manipulation.
When it comes to straight closures, versatility is key. They come in various sizes and textures to suit every need, style preference, and budget. Below, we break down the most popular straight closures available and how each type can enhance your styling experience.
The Classic 4×4 Straight Closure
The 4×4 lace closure is one of the most popular and widely used sizes. Measuring four inches in width and length, it provides a rectangular patch of lace perfect for creating a natural center or side part. This size is ideal for those looking for a simple, clean look without the need for extensive parting space.
Among the best options in this category are:
- Malaysian Straight 4×4 Closure: Known for its silky texture and durability.
- Straight 4×4 Transparent Closure: Offers a more natural finish by blending seamlessly with a variety of skin tones.
These closures are perfect for everyday wear, offering both simplicity and elegance.
More Options for Versatility: Straight Closures in Different Sizes
If you’re seeking more styling flexibility or larger parting spaces, consider exploring closures beyond the standard 4×4 size.
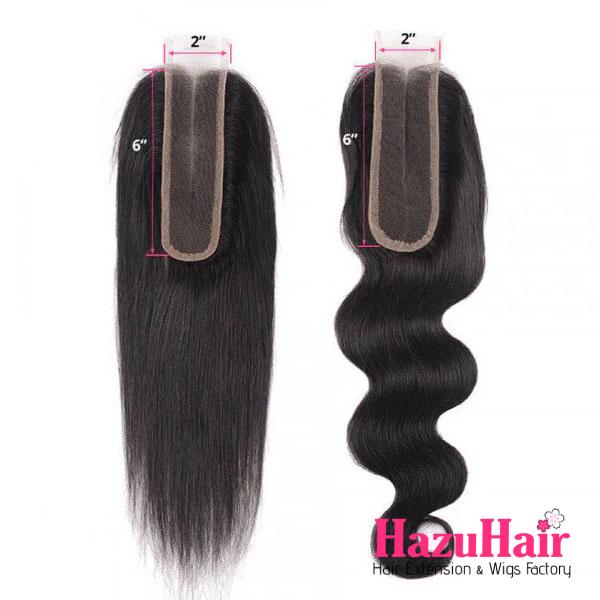
Straight 2×6 Closures:
- Straight 2×6 Transparent Closure
- Silky Straight 2×6 HD Closure: These closures are narrower, offering a sleek, elongated part that’s perfect for middle-part styles without requiring a full lace piece. They are budget-friendly and great for maintaining a minimalist, natural look.
Straight 5×5 Closures: With an extra inch of lace compared to the 4×4, the 5×5 closure provides a larger parting area for increased styling options.
- HD Brazilian Straight 5×5 Closure: Offers an ultra-thin, seamless lace for a nearly invisible hairline.
- Brazilian Straight 5×5 Transparent Closure: Perfect for a clean, natural finish across a range of skin tones.
6×6 and 7×7 Closures: As the size increases, so does the flexibility in styling and the area of scalp-like coverage. These closures allow for more intricate hairstyles, deeper parts, and even slight updos while maintaining a natural look.
Explore a Variety of Textures
While the focus here is on straight closures, you’ll also find them available in a range of textures to suit any desired look:
- Wavy and Curly Closures: Great for voluminous, textured hairstyles.
- Kinky Closures: Perfect for replicating natural Afro-textured hair with added versatility.
No matter your preference, closures provide the ideal foundation for creating wigs or sew-ins that look incredibly natural while protecting your natural hair from damage. Whether you prefer the simplicity of a 2×6 closure or the styling freedom of a 7×7 lace piece, there’s a straight closure option to match every need.
>>>Bob Wigs on a Budget: Affordable Options That Look Like a Million Bucks!
How to Get a Natural Hairline with a Straight Closure: A Detailed Guide
Planning to install your straight closure on your own? While it may seem challenging, all it takes is one successful attempt to build your confidence. From there, your skills will only improve! Achieving a flawless, natural-looking hairline with a straight closure involves the right preparation, installation techniques, and styling finesse. Follow this comprehensive step-by-step guide to create a seamless, scalp-like appearance:
Choose the Right Closure
The foundation of a natural-looking hairstyle begins with selecting a high-quality closure. Always opt for 100% human hair lace closures for the most realistic finish. HazuHair offers premium HD lace closures that blend effortlessly with various skin tones, creating an invisible hairline.
Also, consider the closure’s density. Choose one that closely matches your natural hair to avoid an overly bulky or unrealistic look. The additional parting space in closures like 5×5 or 6×6 provides greater styling flexibility.
Prepare the Closure
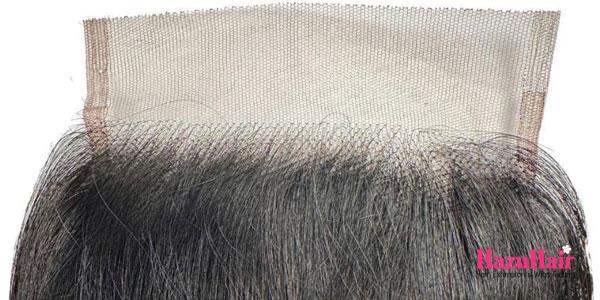
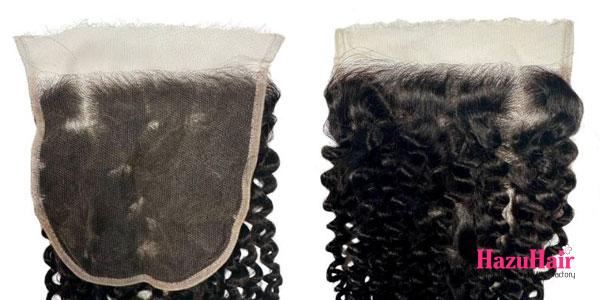
To make the lace look more like your scalp, you’ll need to bleach the knots the small dark spots where individual hair strands are tied to the lace.
- Mix a bleach powder and developer into a thick paste.
- Apply the mixture to the underside of the lace with a gentle patting motion.
- Let it sit for 15-20 minutes or until the knots lighten to a scalp-like shade.
Some closures come pre-bleached. If yours doesn’t, and you’re unsure about this step, consider professional help for a polished finish.
Customize the Hairline
Natural-looking closures mimic the irregularity of a real hairline. To achieve this, you’ll need to pluck some of the hairs from the front of the closure.
- Secure the closure on a wig head or mannequin.
- Use tweezers to carefully pluck small sections of hair along the hairline, creating a gradual thinning effect.
- Avoid over-plucking to prevent gaps or bald spots. Step back frequently to assess your progress.
For an even more authentic touch, create subtle baby hairs along the front. Trim a few fine strands near the hairline and use a small brush and styling mousse to lay them flat.
Prepare Your Natural Hair
For the best results, your natural hair must be flat and smooth beneath the closure.
- Braid your hair into cornrows or flat twists.
- Wear a protective wig cap that closely matches your skin tone. You can also apply foundation or powder to blend the cap with your scalp color for an even more seamless look.
Install the Closure
Proper placement and secure installation are crucial for a natural result.
- Position the closure so that its hairline aligns perfectly with your natural hairline.
- Apply a thin layer of lace adhesive or glue along your hairline, following the shape of the closure.
- Wait until the glue becomes tacky (about 30 seconds to 1 minute).
- Gently press the lace down, starting from the center and moving outward. Use a comb or your fingertips to smooth it down and ensure it sticks evenly.
For extra hold, tie down the lace with a silk scarf for 10-15 minutes to allow the adhesive to set firmly.
Blend and Style
Once the closure is secure, trim any excess lace using small, precise scissors. Follow the natural curve of your hairline to avoid a straight, unnatural edge. Apply a small amount of powder or foundation to the lace to further blend it with your skin tone.
Now, style your hair as desired! A straight closure allows you to achieve sleek middle or side parts while protecting your natural hair.

>>>Bob Wigs 101: A Beginner’s Guide to Your First Wig Purchase!
How to Perfectly Blend a Closure with Your Skin for a Natural Look
To elevate your hairstyle and achieve a flawless, scalp-like finish, blending your lace closure with your skin tone is a critical step. Proper blending ensures that the lace appears nearly invisible, making your closure look as if the hair is growing directly from your scalp. Follow these detailed tips to master this technique:
Match the Lace with Your Skin Tone
The key to seamless blending is ensuring that the lace color matches your skin. Most closures come in different lace shades, including transparent, medium brown, and HD lace.
- Tint the Lace (if necessary): If the lace does not match your skin tone, you can tint it with a lace tint spray or a light foundation that blends well with your complexion. Lightly spritz or dab the tint on the underside of the lace and let it dry completely before installation.
- Use a Skin-Tone Foundation or Powder: Once the closure is installed, apply a small amount of liquid foundation or powder that perfectly matches your skin tone along the lace parting and edges. Use a makeup sponge or brush for even coverage, focusing on blending the foundation into your skin to avoid harsh lines.
Customize and Style Baby Hairs
Creating baby hairs around the hairline adds softness and realism to your look.
- Trim Fine Hairs: Use small scissors to trim a few fine strands along the front of the closure. Keep them short and subtle for a natural effect.
- Shape with Edge Control Gel: Apply a small amount of edge control gel or mousse to lay the baby hairs flat. Use a toothbrush or a fine-tooth brush to shape gentle swoops or curls.
Baby hairs help blur the transition between the lace and your natural hairline, enhancing the illusion of a seamless scalp.
Use a Flat Iron for a Sleek Finish
Straight closures are designed for smooth, sleek hairstyles. To enhance this polished look:
- Heat-Style for Perfection: Use a flat iron on a low to medium heat setting to straighten the hair. Gently run the iron through small sections to create a silky, frizz-free finish. Avoid applying excessive heat to the lace area to prevent damage.
- Apply a Heat Protectant: Always use a heat protectant spray to safeguard the hair fibers from heat damage and maintain the closure’s longevity.
Create a Natural-Looking Parting
The placement and styling of the part in your closure can make or break its realistic appearance.
- Pluck the Parting: If the parting space is too dense, use tweezers to gently pluck hairs from the part to thin it out. This creates a more natural part that mimics your scalp. Be careful not to over-pluck.
- Apply Foundation to the Part: After plucking, apply foundation or powder in the same tone as your scalp along the parting line. This step enhances the illusion of a real scalp showing through the part.
- Seal with Setting Spray: Lightly spritz a makeup setting spray over the foundation to keep it from smudging throughout the day.
Extra Tips for Achieving the Perfect Natural Hairline
While the steps mentioned earlier will get you nearly there, there are additional tips that can take your natural hairline to the next level. With these extra techniques, you’ll be able to ensure that your straight closure looks flawless and seamlessly blends with your natural hair.
Thin Out the Closure for a Softer Look
Plucking the hairline is a great way to start, but you can take it a step further by thinning out the rest of the closure.
- Focus on the Density: Closures often come with a certain level of density that can sometimes look too bulky. To make it look more natural, use tweezers to gently thin out the hair across the entire closure. This helps the weave blend better with your natural hair, especially if your hair is finer or thinner.
- Even Out the Hair: Be careful to pluck evenly to avoid any patchy spots. Always pluck a little at a time and step back to check how it looks. You want to maintain a balanced and soft look that mirrors the density of natural hair.
Master the Baby Hairs Technique
Creating baby hairs around your closure is a classic method to achieve a more natural hairline. Baby hairs are small, fine hairs that frame the face, and when styled correctly, they can completely transform the appearance of your closure.
- Careful Plucking: Start by plucking some small baby hairs along the hairline of your closure. Don’t overdo it less is more when it comes to baby hairs.
- Use Edge Control: Once you’ve created the baby hairs, use a small amount of edge control gel or styling mousse to lay them down. You can create soft swoops or gentle curls that follow the natural direction of your hairline. For a more realistic look, try to mimic the natural baby hairs you would have.
- Blend Seamlessly: After styling, gently blend the baby hairs into the rest of the closure with a fine-tooth comb or small brush to keep them looking soft and natural.
>>>8 Reasons Why Wigs Are the Best Protective Style!
Keep the Closure Clean and Well-Maintained
Just like your natural hair, your closure needs regular care and attention to keep it looking fresh and natural. Maintaining your straight closure properly ensures that it stays in top shape, helping you avoid any artificial-looking edges or fading over time.
- Clean and Condition Regularly: Gently wash the closure with a sulfate-free shampoo to avoid drying out the hair. Condition regularly to keep the hair soft, shiny, and healthy.
- Avoid Excess Product Build-Up: Avoid using heavy styling products that can weigh the closure down or leave a residue. Light, leave-in conditioners or oils work best to keep it looking shiny and natural.
- Replait and Rebraid: If you’ve braided your natural hair under the closure, ensure that you maintain the braids to prevent them from becoming loose, which could affect the overall look of the closure.
Opt for the Right Closure Fit
The right closure fit plays a significant role in how natural it looks once installed. Make sure the closure you choose fits snugly and is well-aligned with your natural hairline.
- Ensure Proper Sizing: Closures come in various sizes, from 4×4 to 7×7. Make sure you select a size that fits well with your head and gives you enough space for customization.
- Use Lace Tints and Foundations: If your lace closure isn’t matching your skin tone, you can use lace tint sprays or foundation to ensure the lace blends perfectly with your scalp.
Protect the Closure at Night
To maintain the natural look and longevity of your straight closure, protect it during sleep.
- Use a Satin or Silk Scarf: Wrap your closure with a satin or silk scarf to protect it from friction that can cause tangling or frizz.
- Nighttime Care: You can also wear a satin bonnet to keep the closure smooth and intact, preventing it from getting damaged while you sleep.
Share your ideas or any techniques you use to get a natural hairline in the comments below! And don’t forget, the best straight closures are available at HazuHair for an impeccable, authentic look every time.
and…

If you’re looking to buy high-quality wigs or hair extensions, look no further than HazuHair.
We are a trusted Vietnamese hair factory with over 100 skilled workers, offering a wide range of hair styles including wavy, curly, straight, kinky, and more.
Our products come in various colors such as natural black, ombre, blonde, red, pink, and many others.
Reach out to us today!
- Hair Factory: Tan Son 2 Village, Tan Dinh, Lang Giang, Bac Giang Province, Vietnam
- Hotline: +849 4949 3883
- Whatsapp Mrs ThanhLam: https://wa.me/84949493883
- Website: https://hazuhair.com