Hair knowledge
Pro Tips: How to Install a 2×6 Lace Closure
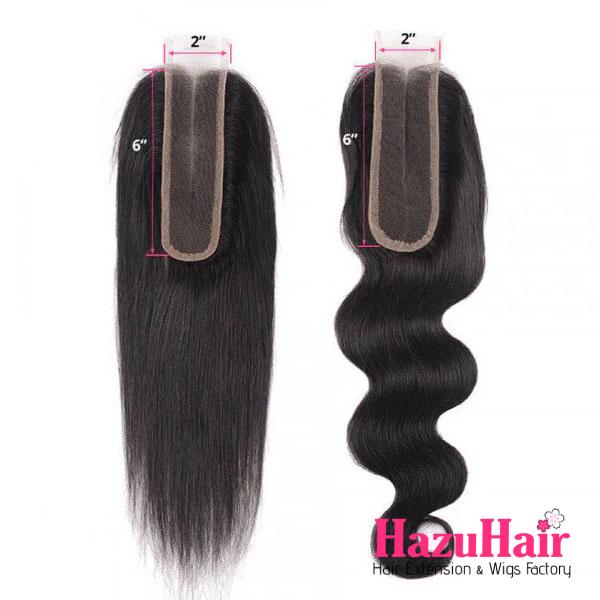
The 2×6 lace closures have emerged as a top choice among today’s hair enthusiasts thanks to their compact size while still offering full coverage.
Despite their smaller dimensions, they provide seamless blending with natural hair, creating a flawless, realistic look. These closures mimic the scalp perfectly, offering a natural appearance while protecting your natural hair from the damage caused by frequent styling.
Leading the trend in modern hair fashion, the 2×6 lace closure is a must-have, and you can easily find your ideal one at a HazuHair store. For the perfect finished look, proper installation is key. While the process is straightforward, paying attention to a few essential tips ensures the best results.

>>>To Invest or Not To Invest: Should You Invest In Hair Extensions?
Required Materials for 2×6 Lace Closure Installation
To ensure a smooth and hassle-free process while installing your 2×6 lace closure, having the right tools and materials is crucial. Here’s a comprehensive list of everything you’ll need:
- 2×6 Lace Closure: The star of the process, providing the foundation for your flawless hairstyle. Choose a closure that matches your hair texture and color for seamless blending.
- Needle and Thread: These are essential for securely sewing the lace closure onto your hair. Make sure to use strong, durable thread to avoid any slipping.
- Hair Clips: These are used to section off your hair while working, allowing you to focus on one part of your hair at a time for precise application.
- Scissors: A sharp pair of scissors will come in handy for trimming excess lace and any stray hairs around the closure to achieve a clean, polished look.
- Wig Cap: This serves as a base to attach the lace closure. Ensure it’s snug and comfortable for a smooth application.
- Lace Glue or Adhesive: If you prefer to use glue for a more secure hold, lace adhesive or glue will ensure your closure stays in place without shifting.
- Comb and Brush: A wide-toothed comb and a soft brush will help in detangling your hair and preparing it for the installation process.
- Hairpins: Use hairpins to hold your hair in place while you’re working, ensuring that sections stay separated and easy to manage.
Step-by-Step Installation Guide for 2×6 Lace Closure
Installing a 2×6 lace closure may seem like a challenging task at first, but with the right steps and attention to detail, you can achieve a flawless look. Here’s a detailed guide to help you through the process:
Prepare Your Natural Hair
The first step is essential to ensure that the 2×6 lace closure adheres properly and lasts longer. Start by washing and conditioning your natural hair. The goal is to remove any oils, dirt, and product buildup that may interfere with the adhesive’s effectiveness.
Use a mild, sulfate-free shampoo and conditioner to clean your hair without stripping it of its natural moisture. This ensures that the closure will blend seamlessly with your natural hair.
- Deep Condition Your Hair
To provide extra nourishment to your hair, deep condition it a day before you install the closure. Deep conditioning will hydrate and soften your hair, ensuring a smooth base for the closure. This step is especially important for maintaining the overall health of your natural hair while wearing the closure.
- Dry Your Hair Thoroughly
Once your hair is clean, dry it thoroughly before proceeding. Wet hair can contain excess moisture, which may promote mold growth or cause the lace closure to slip or become damaged. To dry your hair, gently pat it with a soft towel, and then allow it to air dry. Avoid using heat appliances like blow dryers, as they can cause heat damage to both your natural hair and the closure, especially since closures can be more sensitive to heat.
- Braid Your Hair into Cornrows
Next, braid your natural hair into cornrows. This step is crucial to create a flat, secure base for the lace closure. Divide your hair into manageable sections, which will make the braiding process easier and ensure an even result. The cornrows should be moderately tight tight enough to keep the closure in place but comfortable enough to avoid causing discomfort. Braiding the hair will help the 2×6 closure lie smoothly and naturally over your scalp, ensuring a seamless look.
- Wear a Wig Cap (Optional)
While wearing a wig cap is optional, it can help you achieve a seamless look. A wig cap mimics the natural scalp, which ensures that the closure blends smoothly without noticeable folds. It also helps keep your natural hair in place while you work. If you choose to wear a wig cap, make sure it fits snugly and securely over your cornrows. For the best fit, HazuHair offers a variety of high-quality wig caps that you can purchase at an affordable price.
>>>Guide for Using Human Hair Extensions for Braiding Techniques
Positioning the Lace Closure
Correct positioning of the lace closure is crucial for a flawless look. Follow these detailed steps to ensure your 2×6 lace closure is perfectly aligned with your natural hairline:
- Aligning the Closure
Start by carefully placing the 2×6 lace closure on your scalp, ensuring it sits directly over your natural hairline. Make sure that the closure aligns perfectly with your natural edges. It’s helpful to use hair pins to temporarily secure the closure in place, preventing it from shifting while you check the fit.
Take a moment to check that the lace closure lies flat against your scalp. Look for any creases, folds, or turns in the lace material. A smooth, flat application is essential for achieving a seamless and natural look. Adjust the closure as necessary to ensure it fits snugly and evenly along the hairline.
- Check the Fit
Before moving forward with sewing, take the time to check the fit of the closure. It’s essential to verify that the 2×6 closure provides adequate coverage and that it blends seamlessly with your natural hairline. The closure should look natural and not have any visible gaps or lines where the lace ends.
Using a mirror, carefully examine the closure from different angles. Make any necessary adjustments to ensure that the lace closure sits correctly and comfortably. This step will help you achieve a more polished and professional finish.
Sewing the Closure
Now that your lace closure is in position, it’s time to sew it securely in place. Follow these steps for a professional and long-lasting installation:
- Thread the Needle
Start by selecting a thread that matches the color of your natural hair. This will help the stitches blend seamlessly with your scalp and natural hair, ensuring that the closure appears flawless. Thread the needle with the chosen hair-colored thread, and if you want extra security, double the thread. This will provide additional strength to the stitches.
- Start Sewing
Begin sewing by using anchor stitches. These are initial stitches that help secure the lace closure to your scalp and prevent it from shifting. Start at one side of the closure and work your way around the perimeter of the lace. Be sure to use small, tight stitches to ensure a secure fit. This process helps hold the closure in place and creates a durable bond between the closure and your natural hair.
As you sew, make sure to work all around the perimeter, keeping the closure taut and in position. Sewing around the edges ensures that the closure stays firmly attached without any movement.
- Secure the Ends
Once you’ve completed the stitching around the entire perimeter of the closure, it’s time to secure the threads. Tie a firm knot at the end of the thread to prevent it from unraveling. After securing the knot, carefully cut off any excess thread to avoid visible strands around the closure. This will give the installation a neat, professional finish.

Blending the Closure
To achieve a flawless and natural look with your 2×6 lace closure, the blending process is essential. Here’s a detailed guide to make sure your closure integrates perfectly with your natural hair.
- Cut the Lace
Once you’ve sewn the lace closure into place, the next step is to carefully cut away the excess lace. Use sharp, precise tools to make the process easier and more accurate. It’s important not to cut too close to the hairline or closure. Leave a small margin of lace to ensure that the natural hair won’t unravel. Cutting too closely can cause the lace to fray, and the integrity of your closure could be compromised. Take your time and ensure that the lace is cut evenly along the edges for a clean, professional finish.
- Style the Hair
Once the lace is cut, it’s time to style your hair. Begin by detangling the hair with a brush or comb that is specifically designed for closures. A detangler will help prevent breakage and ensure the hair stays smooth. At this stage, you can style the closure however you prefer, whether it’s sleek, straight hair or voluminous curls. Choose a style that suits your look, and feel free to experiment with different textures.
If you’re using heated styling tools like straighteners or curling irons, be sure to apply heat protectant before styling. This protects the closure from heat damage, keeping the hair looking fresh and vibrant. Heat protectants form a protective layer around the hair, preserving its texture and preventing it from becoming dry or brittle.
- Blend with Natural Hair
While styling, ensure the closure blends seamlessly with your natural hair. You may need to adjust the texture or style your natural hair to match the closure’s look. If your natural hair is a different texture, using a flat iron or curling iron can help create a uniform look that blends the closure with your natural hair. Pay attention to blending the edges around your hairline to ensure there’s no visible separation between the closure and your natural hair.
>>>Cultural Aspects and Significance of Braiding Hair Throughout History
Using Adhesive
Using adhesive for attachment is optional, but it can provide a more secure and long-lasting hold for those who want added stability for their 2×6 lace closure. Here’s how to apply adhesive properly:
- Amount of Adhesive
When using adhesive, a thin, even layer is all you need. Avoid applying too much adhesive, as this can cause the glue to seep through the lace and create visible spots on the closure. Start with a small amount of adhesive and apply it evenly over the lace area. Make sure it’s spread out well, without forming any lumps or excess, to avoid creating a messy or uneven finish.
- Way of Application
To ensure that the closure stays securely in place, apply the adhesive evenly across the lace, focusing on the perimeter where the closure meets your scalp. Allow the adhesive to set for a few minutes so it can properly adhere to the skin. Once the adhesive is slightly tacky, press the lace closure gently into place, ensuring that it sits securely on your scalp.
Before styling, check the closure to make sure it doesn’t shift or slide out of place. If necessary, you can apply a little more adhesive in areas where the closure feels loose. It’s important to check the closure thoroughly before proceeding with any styling to avoid it slipping or becoming uneven.

FAQs
Q: What can I do to avoid my lace closure from shifting?
A: To ensure your lace closure stays in place and does not shift, it is crucial that it is properly secured. This can be done by sewing it in tightly or using a strong lace adhesive to glue it down. After installation, avoid activities that may cause excessive sweating or submerging the closure in water, as both can affect its hold. If water exposure is unavoidable, consider using a powerful lace adhesive designed to withstand moisture, ensuring a longer-lasting and secure hold.
Q: How should I handle it if my lace closure begins to shed?
A: Some shedding is completely normal for lace closures, as it mimics natural hair shedding. However, excessive shedding may indicate that the closure is experiencing damage. To minimize shedding, avoid brushing your hair while it is wet, as this can lead to breakage. Instead, opt for a wide-tooth comb to detangle hair gently. Additionally, using a leave-in conditioner or hair serum can help keep the closure smooth and reduce tangling, further preventing excessive shedding.
Q: What lace closure should I wear depending on my hair type?
A: When selecting the right lace closure for your hair, it’s important to consider several factors such as hair texture, color, and preferred length. Choose a lace closure that closely matches your natural hair’s texture, whether it’s straight, wavy, or curly. Additionally, make sure the closure’s color matches your hair to ensure a seamless blend. If you prefer to add length, opt for a closure that complements the overall style you want to achieve.
Q: Can I wash the lace closure and use it again?
A: Yes, you can reuse your lace closure as long as proper care is taken. After each use, it is essential to rinse the closure thoroughly to remove any product buildup or oils. After washing, gently pat the closure dry with a towel and allow it to air dry in a dry, relaxed environment to preserve its quality. Avoid wringing or exposing it to high heat, as this can damage the closure’s fibers. When stored properly, your lace closure can serve you for many applications.
Q: How do I repair a lace closure that has been torn?
A: If your lace closure experiences a tear, it can usually be repaired with a simple sewing process. First, gather a needle and thread that matches the color of the lace. Carefully sew the torn area, ensuring that the stitches are tight and secure to prevent further damage. Take your time during this process, as careful stitching will prevent the tear from worsening. For added durability, you can double the thread to reinforce the repair, ensuring the closure lasts longer.

>>>Simple Braid Hairstyles Perfect for the Summer
Flawless 2×6 HD Lace Closures
A 2×6 lace closure can completely transform your hairstyle, offering a natural and seamless look that blends effortlessly with your own hair. Whether you’re opting for the Deep Wave 2×6 HD Closures or another texture, following a proper installation guide is key to achieving the flawless finish you desire.
The first step is to gather the necessary materials, including a needle and thread, hair clips, scissors, and lace glue or adhesive. Once you have everything, follow the step-by-step instructions for preparing your natural hair and positioning the closure securely. It’s important to align the closure perfectly with your natural hairline for a realistic appearance.
Make sure the closure is sewn or glued down tightly to avoid any shifting or discomfort. A secure attachment will ensure a long-lasting and flawless result. Additionally, proper care is essential wash the closure regularly and use heat protectants to maintain its texture and durability.
By following these tips and using the right materials, your 2×6 HD lace closure will provide you with a stunning, natural-looking hairstyle that lasts. Whether you want a sleek look or voluminous waves, your lace closure can be styled to suit any occasion.
and…

If you’re looking to buy high-quality wigs or hair extensions, look no further than HazuHair.
We are a trusted Vietnamese hair factory with over 100 skilled workers, offering a wide range of hair styles including wavy, curly, straight, kinky, and more.
Our products come in various colors such as natural black, ombre, blonde, red, pink, and many others.
Reach out to us today!
- Hair Factory: Tan Son 2 Village, Tan Dinh, Lang Giang, Bac Giang Province, Vietnam
- Hotline: +849 4949 3883
- Whatsapp Mrs ThanhLam: https://wa.me/84949493883
- Website: https://hazuhair.com