Hair knowledge
Expert Tips For a Flawless Lace Glue Application
There’s nothing quite as satisfying as transforming your hairstyle into a completely new look. Whether you’re experimenting with bold styles or enhancing your natural beauty, lace glue plays a crucial role in achieving a seamless and long-lasting wig installation.
For beginners, navigating the world of lace front wigs can feel overwhelming, with so many products and techniques to consider. However, mastering the proper lace glue application is the key to ensuring a natural, secure, and flawless finish.
In this guide, we’ll walk you through a step-by-step process to help you perfect your lace glue application, ensuring a strong hold, effortless blend, and ultimate confidence in your wig styling journey. Let’s dive in and take your lace game to the next level!
>>>Ordering Hair Extensions Online: Different Things to Look Out For!
Prepping Your Lace Wig for a Flawless, Natural Look
When installing a lace wig, achieving a natural and realistic appearance starts with proper preparation. One of the key steps is bleaching the knots the small dark dots where hair strands are tied to the lace. Without this step, the knots can be visible, making the wig look artificial rather than as if the hair is growing naturally from your scalp.
Step 1: Bleaching the Knots for a Seamless Blend
To create a scalp-like illusion, you’ll need to lighten the knots by bleaching them properly. Here’s how:
- Prepare the Bleach Mixture
- Combine bleaching powder and a volume developer (20 or 30 volume, depending on the level of lift you need).
- Mix the ingredients into a thick, creamy paste the consistency should be similar to toothpaste to prevent it from seeping through the lace and over-processing the hair.
- Apply the Bleach
- Turn the wig inside out and gently spread the mixture over the lace, ensuring only the knots are covered.
- Avoid pressing too hard to prevent bleach from seeping through and coloring the hair strands.
- Let It Process
- Leave the bleach on for 15–20 minutes or until the knots become light brown or blonde.
- Keep a close eye on the process to avoid over-bleaching.
- Rinse and Wash
- Once the knots reach the desired shade, rinse the bleach out thoroughly with cold water.
- Use a neutralizing shampoo to stop the chemical process and prevent brassiness.
- Follow up with a purple or blue shampoo to tone any orange or yellow hues, ensuring a natural, scalp-like appearance.
Step 2: Avoiding Over-Bleaching and Adjusting the Lace Color
Over-bleaching can cause weak, overly bright knots that look unnatural or even damage the lace. To avoid this:
- Do not leave the bleach on too long, as knots that are too light can make the lace appear orange or stark white.
- If you prefer an even more customized look, consider tinting the lace with foundation, lace tint spray, or tea to match your skin tone.
- When using foundation, choose a cool-toned shade rather than one with an orange undertone to maintain a seamless and realistic scalp illusion.
>>>10 Ways Hair Extensions Are Helping You Save Money
Mastering the Art of Plucking Your Lace Wig for a Natural Hairline
Plucking is a crucial step in customizing your lace wig to achieve a realistic, natural-looking hairline. Most wigs come with a pre-plucked hairline, but for an even more seamless blend, it’s essential to go in and further tweeze out excess hair to mimic the way natural hair grows. Without proper plucking, your wig can look too thick, bulky, or even unnatural often referred to as the helmet effect.
Step 1: Preparing Your Wig for Plucking
Before diving into the plucking process, you need to decide whether you’ll be working with wet or dry hair:
- Plucking on wet hair: Wetting the hair makes the strands softer and easier to tweeze, giving you more control over shaping the hairline.
- Plucking on dry hair: Dry plucking allows you to see the true density of the wig, helping you determine exactly how much hair to remove.
Once you decide on your preferred method, secure the wig on a mannequin head using T-pins to keep it steady. Brush back the hairline to clearly see the areas that need plucking.
Step 2: The Plucking Process
- Choose the Right Tweezers: Use a high-quality LED plucking tweezer or angled tweezers for precision and to avoid damaging the lace.
- Start at the Temples
- Begin plucking above your ear and work your way towards the middle.
- Avoid plucking in a straight line a natural hairline is uneven, with a mix of thinner and denser areas.
- Use a Gentle, Randomized Technique
- Tweeze small sections at a time, spacing out where you pluck to avoid creating bald spots.
- Hold the hair taut and pluck in different directions to ensure the hairline doesn’t look too uniform.
- Do not pluck too close to the lace this can weaken the wig and lead to premature shedding.
- Create a Gradual Density Effect
- The key to a seamless hairline is a gradient effect meaning the hair is thinner in the front and gradually thickens towards the back.
- Take breaks to step back and assess your progress. Over-plucking can’t be reversed, so go slow and steady.
Step 3: Perfecting the Final Look
Once you’ve plucked to your satisfaction, brush through the wig with a fine-tooth comb or use a blow dryer on low heat to remove any loose strands.
- If necessary, pluck more sparingly around the parting area to reduce bulkiness.
- If you accidentally over-plucked, don’t panic conceal sparse areas with eyebrow powder, eyeshadow, or root touch-up spray that matches the hair color.
- To enhance the final look, apply mousse or styling gel to lay the hair down and set the new shape of your customized hairline.

>>>Why I love Hair Extensions, Wigs, & Weave!
The Ultimate Guide to Installing and Securing Your Lace Wig
Achieving a flawless lace wig installation requires patience, precision, and the right technique. If done correctly, your wig will look as if it’s growing directly from your scalp. This guide will walk you through the step-by-step process of properly installing and securing your lace wig for a seamless, natural look.
Step 1: Preparing Your Natural Hair
Before applying your lace wig, it’s essential to secure your natural hair properly. This ensures a smooth, flat surface for the wig to lay on.
- Braiding or twisting your hair: If you have longer hair, braid it into small, flat cornrows or twist it into sections and pin them down to minimize bulk.
- For short hair: Simply brushing your hair back and using a wig cap will suffice.
- Apply a wig cap: Use an elastic wig cap that matches your skin tone to help create a more natural scalp appearance.
- The “Pinky Finger Rule”: When placing the wig cap, ensure it sits slightly behind your natural hairline. This will help blend the lace seamlessly with your forehead.
Step 2: Cutting the Lace
Trimming the lace is one of the most delicate steps, and precision is key. Unlike cutting paper, cutting lace requires patience and technique to avoid ruining your wig.
How to Cut Your Lace Properly
- Put the wig on first: Adjust the wig to align with your natural hairline before cutting.
- Mark the lace: Use an eyeliner pencil to lightly mark where you plan to trim.
- Use sharp scissors or a razor: A zigzag motion creates a more natural, undetectable hairline rather than a straight-cut edge, which can appear harsh and artificial.
- Trim little by little: Always leave a bit of excess lace rather than cutting too much at once. You can always trim more later if needed.
Pro Tip: If you’re nervous about cutting too much lace, use a razor instead of scissors for a more natural, feathered edge.
Step 3: Cleaning and Prepping Your Skin
To ensure your lace glue adheres properly, your skin must be clean and free of oil, dirt, and sweat.
How to Properly Clean Your Hairline
- Use 70% isopropyl alcohol or a lace cleaner on a cotton pad to wipe along your hairline.
- Make sure to remove all residue from makeup, oil, or sweat.
- Allow your skin to dry completely before applying any glue.
Pro Tip: If you have sensitive skin, use a skin protectant or lace glue barrier to prevent irritation.
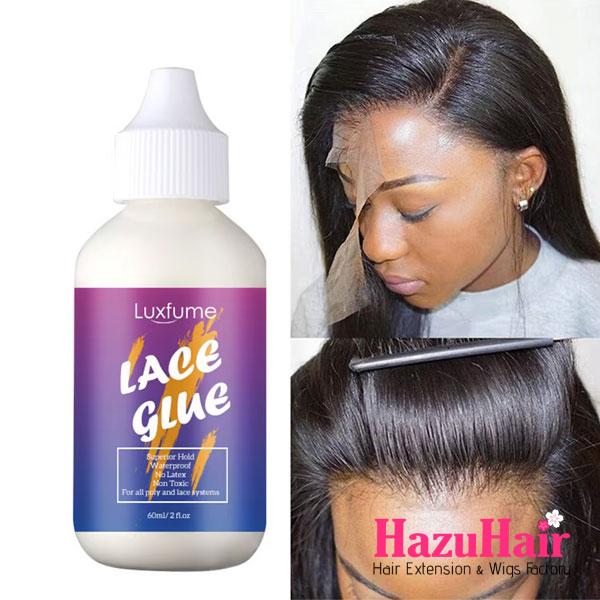
Step 4: Applying the Lace Glue
The right lace glue is crucial for a long-lasting, strong hold while still being gentle on your scalp.
How to Apply Lace Glue for a Secure Hold
- Apply the first layer: Squeeze a small amount of waterproof lace glue along your hairline in small dots.
- Spread evenly: Use a rat-tail comb to smooth the glue into a thin, even layer.
- Wait for it to turn clear: The glue should dry clear before applying the next layer.
- Repeat for a stronger hold: Apply 2-3 thin layers, waiting for each layer to dry clear before adding the next.
- Press and secure the lace: Once the final layer is tacky, gently press the lace onto the glue using the back of a comb.
Pro Tip: Avoid applying too much glue at once. Thin layers ensure a stronger and cleaner bond.

>>>True Hair Game: The Truth about Your Hair Extensions
Step-by-Step Guide to Attaching and Styling Your Lace Wig
Once you’ve prepared your wig and secured it properly, the next crucial step is attaching, melting, and styling the lace to achieve a seamless, natural look. This process requires precision and patience, but once mastered, your lace wig will appear completely undetectable.
Step 1: Attaching Your Wig Securely
Attaching your wig properly ensures a strong hold and prevents lifting throughout the day.
How to Attach Your Lace Wig Like a Pro
- Align the lace wig with your hairline: Place the wig on your head and adjust it so it sits naturally along your hairline.
- Press down with a rat-tail comb: Using the back of a rat-tail comb, press the lace firmly onto the glued areas. This helps the lace blend more seamlessly with your skin.
- Tie it down for a secure hold: After pressing the lace down, tie a silk scarf or elastic band around your hairline for at least 10-15 minutes. This allows the lace to properly adhere to your skin and minimizes lifting.
Pro Tip: Avoid touching or shifting your wig during this time, as it may interfere with the adhesive bonding.
Step 2: Melting the Lace for a Seamless Finish
Melting the lace is the key to making your wig look like real hair. It helps eliminate any visible lace edges and blends the wig into your skin flawlessly.
How to Melt Your Lace for an Invisible Look
- Apply freeze spray: Lightly spray a lace-melting spray or freeze spray across your forehead, just above the lace.
- Press down firmly: Use a rat-tail comb or your fingers to gently press the lace into your skin. This helps remove any harsh lines and ensures a seamless blend.
- Use heat or a satin scarf:
- Option 1: Heat Method – Use a blow dryer on a warm setting while pressing the lace down with a comb.
- Option 2: Wrapping Method – Tie a silk scarf or elastic lace band around your hairline for at least 10-15 minutes.
- Check for lifting: Once the lace has set, gently lift the scarf and check for any loose areas. If necessary, apply more spray and repeat the process.
Pro Tip: If you see any remaining white residue from the lace glue, lightly dab foundation or lace tint to blend it into your skin tone.
Step 3: Cutting and Styling the Baby Hair
Baby hairs enhance the natural look of your wig and create a soft, seamless hairline. If your unit doesn’t come with precut baby hairs, you can cut and style them yourself.
How to Cut and Style Baby Hair
- Section out baby hairs: Take a thin section of hair from the hairline (about ½ inch) using a rat-tail comb.
- Cut baby hairs at an angle: Use a small pair of scissors or a razor to trim the hair at a downward angle. Avoid cutting straight across, as this can make the baby hairs look unnatural.
- Style with edge control: Apply a small amount of edge control or styling gel and use an edge brush or toothbrush to create soft, swooping baby hairs.
Pro Tip: If you want a more dramatic look, you can create thicker, more defined baby hairs. For a subtle and natural look, keep them thin and lightly swooped.
Step 4: Styling Your Wig for a Natural Finish
Your wig’s final appearance depends on how well you style and manipulate it. The right technique can enhance the realism of your lace wig installation.
How to Style Your Lace Wig for a Flawless Look
- Use a lace tint mousse: Apply lace tint mousse along the lace to help further blend it into your skin tone.
- Set it with a silk scarf or lace band: Tie a silk scarf or elastic band around the hairline and use a blow dryer on a low setting to help the tint set.
- Hot comb the hairline and parting:
- Use a hot comb to press down the hairline for a sleek, natural appearance.
- If your wig has a parting, use the hot comb to flatten and define it.
- Final touch-ups: Once everything is set, gently brush through the hair, fluff it out, and apply a light mist of holding spray to keep everything in place.
Pro Tip: If you want to create different hairstyles, you can curl, straighten, or even dye your lace wig just make sure it’s heat-friendly before using hot tools!

>>>The Worst Things You Can Do To Your Hair Extensions This Summer
Achieve a Seamless Look with Invisible Lace Glue
Now that you’ve mastered the step-by-step process of installing your lace wig, you’re just one step away from achieving a flawless, undetectable finish. By customizing your lace and using the right techniques, you can close the gap between a good installation and a perfect, natural-looking fit.
With practice and the right knowledge, securing your lace wig with a stronghold and seamless blend will become second nature. Consistency is key, and as you refine your technique, your wig installations will look more effortless and long-lasting.
Lace front wigs are incredibly versatile, allowing you to transform your look into any unique style you desire. Whether you prefer sleek and straight, voluminous curls, or a chic updo, the possibilities are endless.
With the perfect hold and expert styling, you can step out with confidence, knowing your lace wig is secure, undetectable, and beautifully installed.
and…

If you’re looking to buy high-quality wigs or hair extensions, look no further than HazuHair.
We are a trusted Vietnamese hair factory with over 100 skilled workers, offering a wide range of hair styles including wavy, curly, straight, kinky, and more.
Our products come in various colors such as natural black, ombre, blonde, red, pink, and many others.
Reach out to us today!
- Hair Factory: Tan Son 2 Village, Tan Dinh, Lang Giang, Bac Giang Province, Vietnam
- Hotline: +849 4949 3883
- Whatsapp Mrs ThanhLam: https://wa.me/84949493883
- Website: https://hazuhair.com