Hair knowledge
Vixen Sew-In: A Comprehensive Guide to the Best Hair Weave Techniques
OMG! Do you ladies remember when the vixen sew-in became popular? My best friend sent me a detailed video on how to do it, and I was instantly intrigued. I practiced for hours on a mannequin and with my friend, but I struggled with the leave-out.
Frustrated, I turned to YouTube, where stylists kept saying, “You have to have the eye” for the leave-out. Really? After lots of practice, I finally mastered it! Today, I’m here to share everything you need to know about the vixen sew-in, which I consider a luxury hairstyle. 💠💠
This unique style offers versatility that every woman craves. You can easily pull your hair into a ponytail or a messy bun without any lumps, and switch between side parts whenever you want.
So, get the kids and hubby settled, grab your snack, put your phone on silent, and get ready to take notes because I’m about to drop some serious knowledge!
What Is a Vixen Sew-In?
A vixen sew-in is a technique for installing sew-in extensions that offers greater styling versatility. What sets this method apart from traditional weave installations is the unique braid pattern employed.
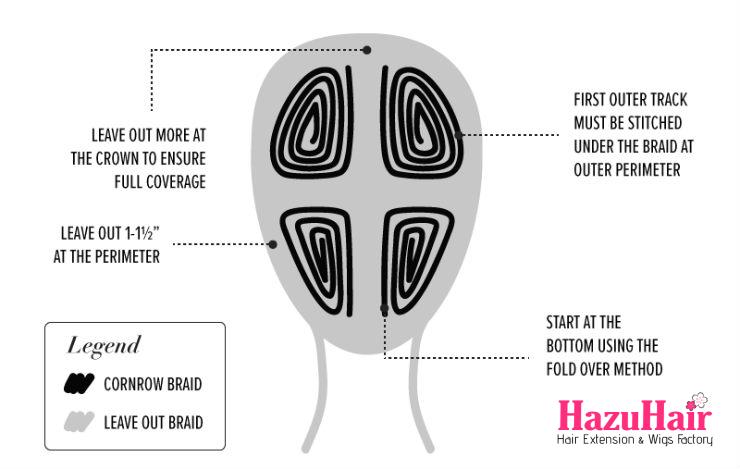
Instead of braiding all your hair straight back or into a single beehive shape, your hair is divided into four quadrants. Each quadrant is braided into a beehive while leaving some hair out around each section. This allows you to create parts between the quadrants, giving you more options for styling. Check out this helpful diagram from Hazu Hair.

A Few Additional Points to Consider
- The vixen weave works best with healthy, voluminous hair that is approximately ponytail length for seamless blending.
- Similar to traditional weave installations, it can be applied to various hair textures, including relaxed, natural, curly, and kinky. Just ensure you select hair that matches your natural texture well.
- For a vixen sew-in, you’ll typically need around 3 to 4 packs of hair.
- This style can last between 8 to 10 weeks.
Pros and Cons of a Vixen Weave
Pros:
The primary advantage of a vixen weave is its enhanced styling flexibility. Unlike a traditional weave, which restricts you to a single hairstyle (unless you’re okay with your tracks showing), the vixen weave allows you to create various parts throughout your hair without any visible tracks. This opens up a world of styling options, making it an ideal choice for those who love to change their look frequently.
Cons:
However, there are some drawbacks to consider when opting for a vixen weave:
- Weft Cutting: When using the vixen method, you typically need to cut your wefts. If you’ve invested significantly in high-quality hair, you might be hesitant to do this due to the potential for shedding. That said, you can avoid cutting by folding over the track at the edge of a braid.
- More Hair Out: A vixen weave requires leaving out more of your natural hair compared to a standard weave. To allow for more styling versatility, you’ll have hair out around the perimeter and down the vertical and horizontal middle sections. This increased exposure can lead to greater risk of damage from manipulation and environmental factors.
- Added Tension: Some individuals report increased tension on the hair with a vixen weave. Certain stylists may braid the hair tightly to withstand various styling options, and incorporating up-dos can exacerbate this tension.
To mitigate these concerns, ensure that your braids are not too tight and avoid placing excessive tension on your hair. Additionally, take good care of your leave-out hair, as having more hair exposed necessitates more maintenance. By being mindful of these factors, you can enjoy the benefits of a vixen weave while minimising potential drawbacks.

What Do You Need for a Vixen Sew-In
To perform a vixen sew-in, you’ll need the following supplies:
- Rattail comb for parting the hair
- Curved or straight needle and thread
- Hairnet (if desired by the client)
- High-quality hair extensions that fit your budget
- Edge control to tame the edges
Before starting with any client, I ensure their hair is clean. I also offer a complimentary trim of the ends if needed—believe it or not, going the extra mile makes a significant difference!
Next, I apply stimulating hair oil to the scalp to promote hair growth.
Now that you have everything you need, let’s get to work!
How to Do a Vixen Sew-In: Step-by-Step
Before we begin, I want to emphasize the importance of patience. You may not master this technique on your first attempt, and some steps might be unclear. If you have questions, feel free to leave a comment, and I’ll gladly assist you. You can also check YouTube for additional guidance.
Ready? Let’s dive in!
1. Hair Preparation
Start by gathering all your curved or straight needles – aim for about ten prepped with thread to keep things moving smoothly.
I recommend making your needles as long as possible; shorter needles will require more frequent changes, prolonging the process.
Before you begin the sew-in, ensure the scalp is oiled, and all hair that will be left out is either braided or twisted.
2. Sewing It Down
Begin sewing the hair extensions from the right top section. Make sure to sew under the braid until you reach the left side, where you’ll use the fold-over method.
The fold-over method is crucial for achieving that sleek ponytail we all love. As you approach the left side, continue sewing upwards, then fold over the weft. After folding, sew under and on top of the weft to ensure a flat and flawless finish.
Tip: If your weft is thick, it’s perfectly fine to split it. This will make it easier to sew down. You can thank me later!
Now, let me share a personal tip from my own learning journey. I remember watching numerous stylists sew down each section and wondering if there was a more efficient method. Instead of treating each section separately, try sewing down the hair as you would for a traditional sew-in. (For more details, check out this article: “How Many Bundles for Sew-In.”)
Just remember this one important thing: always make a knot at the end of each section. If you skip this step, your vixen sew-in could unravel, leading to some real tears!
So, start your sew-in on the right side, make a knot when you finish that section, and continue from there.
3. Blending the Hair
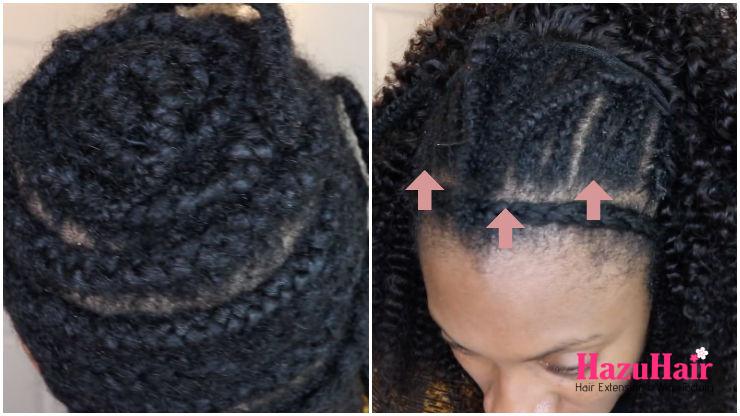
It’s time for the moment of truth! Begin by unbraiding all the leave-out hair around the perimeter and cross-sections of the head.
Before you start styling, take a moment to check each section to ensure you have enough leave-out to cover the weft. If you notice there’s not enough hair left out, it’s best to be honest with your client. This way, she’ll know how to style her hair and will appreciate your transparency.
Once you’re satisfied with the leave-out, it’s time to discuss styling options with your client. In my opinion, this is the most enjoyable part of the process! With the vixen sew-in, you can experiment with various lengths, textures, and colors – giving you plenty of options.
4. Vixen Sew-In Styles
Styling is indeed the highlight of the vixen sew-in. Here are some versatile styles you can achieve:
- Two cornrows styled left or with a right side part.
- A sleek ponytail styled left or right.
- A messy bun with a half ponytail, allowing for some hair to hang down in the back.
This sew-in offers limitless possibilities! If you’re someone who loves to change hairstyles frequently, then the vixen sew-in is the perfect choice for you!

Best Vixen Sew-In Braiding Patterns
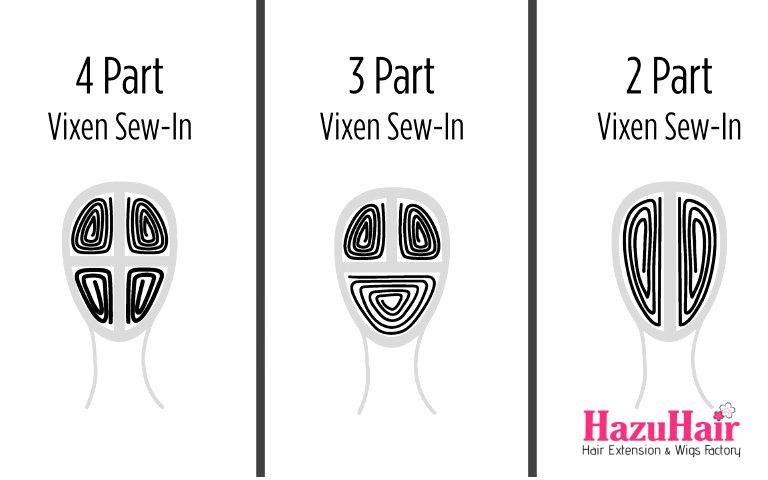
Did you know that there are alternative braiding patterns similar to the vixen sew-in? While we’ve already covered the four-part sew-in, let’s explore the two and three-part variations.
Both the two-part and three-part sew-ins offer fewer styling options, but you can still rock them based on your preferred look.
Two Section Braids
Refer to the provided diagram for a visual guide. If a client requests a two-part vixen sew-in, it’s likely for a quicker application. This pattern allows for two main styles: two cornrows and a bun. While it can be a time-saver, keep in mind that the styling options are limited!
Tools Needed:
- Rattail comb for parting the hair.
- Curved or straight needle and thread.
- Hairnet (if the client desires one).
- Hazu hair extensions available in various textures and lengths, including deep wave and body wave.
- HazuHair edge control to tame the edges.
Step-by-Step Two Section Vixen Sew-In
- Part the Hair: Begin by parting the hair down the middle.
- Leave Out: Ensure there’s enough hair left out around the perimeter of the head. For the middle section, leave out all the hair but keep the cross-section free since you’re only braiding two sections.
- Braid or Twist: Braid or twist all the leave-out hair to keep it separate from the sections being braided.
- Braid the Sections: Start braiding each section, making sure the braids are neat and small.
- Suggest a Hairnet: Offer a hairnet to the client, and prepare all your needles and thread for a smoother process.
When sewing down the hair, follow the same approach as the four-part vixen sew-in. Start from the right side and remember to knot the thread at the end of each section.
Once you reach the left side, execute the fold-over method: go up slightly, fold over the weft, and sew underneath and then over the weft.
When removing any excess thread, be cautious not to cut your knots. I’ve learned this the hard way, doubling my work when I wasn’t careful!
Three Section Vixen Sew-In
Refer to the diagram provided for a visual reference. The three-section vixen sew-in is straightforward and offers slightly more versatility than the two-section option. With this pattern, clients can choose styles such as a middle part with an updo ponytail and the rest of the hair down, or two cornrows combined with a left or right side part.
Tools Needed for Three Section Vixen Sew-In
- Rattail comb for parting the hair.
- Curved or straight needle and thread.
- Hairnet (if the client prefers one).
- Hair extensions (select your desired style and length).
- Edge control to tame the edges.
Step-by-Step Guide to Three Section Vixen Sew-In
- Part the Hair: Begin by parting the hair down the middle.
- Leave Out: Ensure there’s enough hair left out around the perimeter of the head, including for the middle and cross-sections.
- Braid or Twist: Braid or twist all the leave-out hair to keep it separate from the sections you’ll be working on.
- Braid the Sections: Start braiding down each section, ensuring the braids are neat and small.
This pattern provides a good balance between style options and ease of installation!
Vixen Sew-In with Short Hair
Who says you can’t rock a vixen sew-in with short hair? If a stylist claims it’s impossible, it’s time to find a new chair! With hair extensions, anything is achievable. I’ve even seen women opt for glue instead of sew-ins.
When working with shorter hair, you’ll need to leave out a bit more hair than usual to ensure a seamless look. For a more natural appearance, the stylist should position the extensions so they frame the face. This means that when sewing down the wefts, the focus should be on placing more hair at the front rather than behind the braid’s curve.
Does that make sense? This technique creates the illusion of fuller hair while still allowing you to style as usual. Just be cautious not to let your weft show! Good friends will have your back and let you know if something’s off.
If they don’t, maybe it’s time to rethink those friendships – just kidding!
Vixen Styles for Natural Hair
As I mentioned, the vixen sew-in is for everyone, whether you have relaxed or natural hair. When selecting a sew-in weave, it’s crucial to choose the right texture to match your hair.
For instance, I styled a natural beauty using Vietnamese Straight Hair Bundles from HazuHair, and the blend was flawless. These extensions come in both straight and natural wavy patterns, allowing for seamless integration.
The texture of the Vietnamese hair extensions complemented her natural hair beautifully, whether she chose to wear it straight or in its natural curl pattern.
If you have a tighter or looser curl pattern and prefer to avoid heat on your natural hair, hair extensions can be a fantastic solution.
Middle Part Sew-In Techniques with Leave Out
Creating a middle part sew-in requires precision and attention to detail for a flawless finish.
Step-by-Step Guide to a Middle Part Sew-In
Preparation:
- Start by washing and conditioning the client’s hair to ensure it’s clean and manageable.
- Blow-dry the hair or allow it to air dry completely.
Sectioning:
- Part the hair down the middle, creating a straight line from the forehead to the nape of the neck.
- Clip one side of the hair out of the way.
- Leave out a small section of hair along the middle part (about ½ to 1 inch on each side) to cover the tracks and blend with the extensions.
Braiding:
- Begin braiding the client’s natural hair into cornrows, starting from the front and working your way back.
- Ensure the braids are neat and secure but not too tight to avoid discomfort.
- For a middle part sew-in, braid the hair so that the middle part is defined, with the braids curving away from the part to create a seamless look.
Securing the Braids:
- Once all the hair is braided, sew the ends of the braids down using a curved needle and thread, creating a flat base for the sew-in.
Installing the Extensions:
- Begin sewing the wefts of the human hair weave starting from the back of the head, moving upwards toward the top.
- Use a curved needle and weave thread to securely attach the wefts to the cornrows.
- Continue sewing the weave in a horizontal pattern, ensuring the middle part remains clear and defined.
- When you reach the top, carefully sew the wefts close to the leave-out section without crossing over the part.
Blending the Leave-Out:
- Once all the wefts are sewn in, unclip the leave-out section.
- Straighten or curl the leave-out hair to match the texture of the extensions.
- Blend the leave-out hair with the extensions for a seamless and natural look, ensuring the middle part remains defined.
Finishing Touches:
- Trim and style the extensions as desired to achieve the final look.
- Apply a light hold spray or styling product to keep the hair in place.
Mastering the Vixen Sew-In Technique
Mastering the vixen sew-in technique can revolutionise your approach to creating versatile and natural-looking hairstyles for your clients.
With its unique four-part sectioning, the vixen sew-in provides unmatched styling flexibility, making it a top choice for those who enjoy changing their look. By following the detailed steps and tips outlined in this guide, you can achieve a flawless vixen sew-in that combines beauty with functionality.
Whether you’re an experienced professional or just starting, perfecting this technique will enhance your hairstyling skills, leaving your clients impressed and eager for their next appointment.
and…

If you’re looking to buy high-quality wigs or hair extensions, look no further than HazuHair.
We are a trusted Vietnamese hair factory with over 100 skilled workers, offering a wide range of hair styles including wavy, curly, straight, kinky, and more.
Our products come in various colors such as natural black, ombre, blonde, red, pink, and many others.
Reach out to us today!
- Hair Factory: Tan Son 2 Village, Tan Dinh, Lang Giang, Bac Giang Province, Vietnam
- Hotline: +849 4949 3883
- Whatsapp Mrs ThanhLam: https://wa.me/84949493883
- Website: https://hazuhair.com
